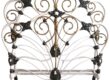
Antique iron beds have captivated homeowners and collectors for over a century — with their graceful curves, solid craftsmanship, and timeless design. Whether passed down as a family heirloom or found at a local estate sale, these beds are more than furniture — they’re pieces of history.
Refinishing an antique iron bed isn’t just a weekend project; it’s a way to preserve the past while creating a stunning focal point for your bedroom. With the right approach, you can transform even the rustiest, most paint-chipped iron bed into a beautifully restored treasure.
This step-by-step guide walks you through the complete process — from sandblasting to finishing — to bring out the original charm of your antique iron beds and ensure they last for generations to come.
Why Restore an Antique Iron Bed?
1. Historical Value
Many antique iron beds date from the mid-1800s to early 1900s. Forged with care and often featuring hand-cast details, they reflect craftsmanship rarely seen today.
2. Sustainability
Refinishing an old iron bed gives it a second life — reducing waste and saving resources by avoiding new manufacturing.
3. Design Impact
Whether you’re decorating in French country, rustic farmhouse, or vintage cottage style, a beautifully restored iron bed becomes the centerpiece of the room.
Tools & Materials for Refinishing an Iron Bed
Preparation Tools
-
Safety goggles and gloves
-
Respirator or dust mask
-
Sandblasting equipment (or access to a professional sandblaster)
-
Wire brush and steel wool
-
Medium-grit sandpaper (80–120 grit)
Stripping & Rust Treatment
-
Paint stripper (optional, for stubborn areas)
-
Rust converter (for any residual corrosion)
-
Cleaning rags and degreaser
Priming & Painting
-
Oil-based rust-inhibiting metal primer
-
Enamel or epoxy spray paint (or brush-on metal paint)
-
Clear topcoat or sealant (optional)
Assembly & Finishing Touches
-
Replacement bolts or hardware (if needed)
-
Rubber or felt pads for floor protection
-
Mattress support system (slats, platform, or bunkie board)
Step-by-Step: How to Refinish Antique Iron Beds
Step 1: Start with Sandblasting
Before anything else, sandblasting is the most effective and professional way to strip away decades of paint, rust, and grime from an antique iron bed. It reaches into grooves, scrollwork, and ornate details that hand-sanding or chemical strippers can’t.
You can:
-
Hire a local metal shop or auto body shop to sandblast the bed
-
Rent equipment if you’re experienced and have proper safety gear
-
Request that the surface be left “bare metal” for painting
⚠️ Safety Note: Sandblasting should be done in a controlled, ventilated environment by professionals, especially if lead-based paint may be present.
Step 2: Inspect the Frame and Take Photos
After sandblasting reveals the bare iron, inspect the iron bed closely:
-
Look for cracks, weak welds, or missing parts
-
Identify any manufacturer marks or original stamps
-
Take reference photos for reassembly and documentation
Now’s the time to make any necessary structural repairs or weld reinforcements.
Step 3: Hand-Sand and Clean
Although sandblasting removes most of the debris, you’ll want to:
-
Lightly sand the entire surface with medium-grit sandpaper
-
Use a wire brush or steel wool on detailed or rough areas
-
Wipe everything down with a clean rag and degreaser
This step smooths the metal and prepares it to hold primer evenly.
Step 4: Apply Rust Converter (If Needed)
If there are any deep rust pits that couldn’t be fully cleaned, apply a rust converter to those areas. It chemically stabilizes remaining rust and prevents future corrosion.
Let it fully dry according to manufacturer instructions before continuing.
Step 5: Prime the Antique Iron Bed
Use an oil-based rust-inhibiting metal primer — ideally in spray form — for smooth and even coverage.
Apply:
-
A light tack coat to start
-
Two full coats, allowing each to dry completely
This primer is crucial for sealing the iron and giving your paint a solid base to adhere to.
Step 6: Paint the Iron Bed
Now that your antique iron bed is primed, it’s time to add color.
Paint Options:
-
Spray Paint (Enamel or Epoxy): Best for curved surfaces and fine details. Choose high-durability options.
-
Brush-On Paint: Thicker coverage and touch-up friendly. Great for a hand-finished, heirloom look.
Common colors include:
-
Classic black or white
-
Soft ivory or cream
-
Matte bronze or pewter
-
Vintage-inspired colors like sage green, navy blue, or blush pink
Apply 2–3 coats, letting each layer dry fully. Spray outdoors or in a well-ventilated area.
Step 7: Add a Clear Protective Coat (Optional)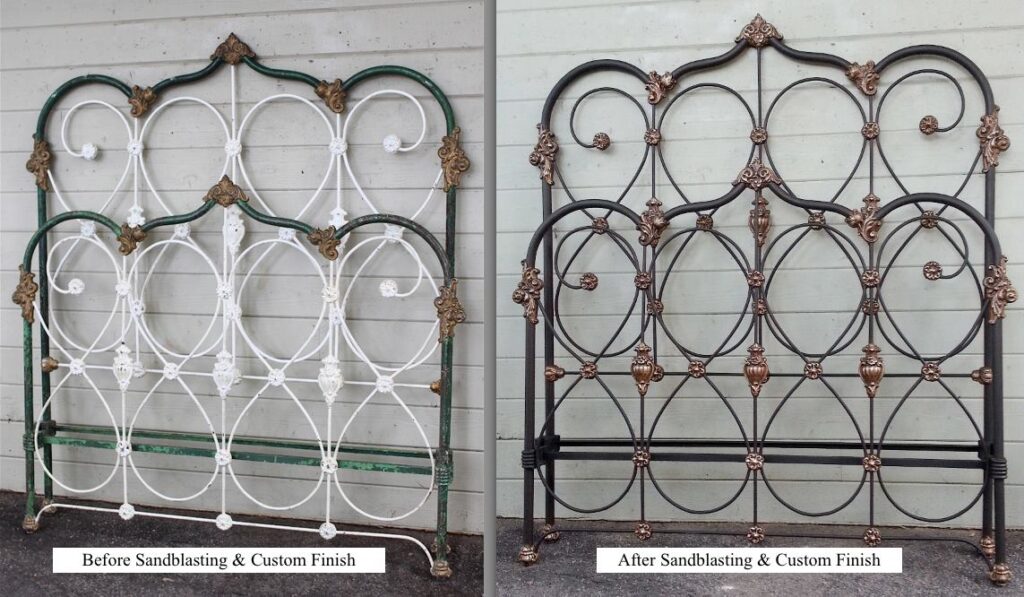
For added durability, especially in humid climates or for high-use beds, apply a clear polyurethane topcoat suitable for metal. This will help resist chips and scratches.
Step 8: Reassemble the Bed
Once all parts are fully cured:
-
Reattach the headboard, footboard, and side rails
-
Replace any missing or damaged bolts or hooks
-
Add rubber or felt pads under the legs to protect your floors
Many antique iron beds were made before mattress size standards, so double-check dimensions. You may need:
-
A custom-sized mattress
-
A full-to-queen conversion kit
-
Support slats or a bunkie board
Styling Ideas for Restored Iron Beds
Now that your iron bed is beautifully refinished, here are some styling suggestions to suit your space:
️ Vintage Farmhouse
-
Soft neutrals, linens, and plaids
-
Woven baskets, wooden crates, and antique trunks
-
Layered quilts and hand-stitched bedding
️ Romantic Cottagecore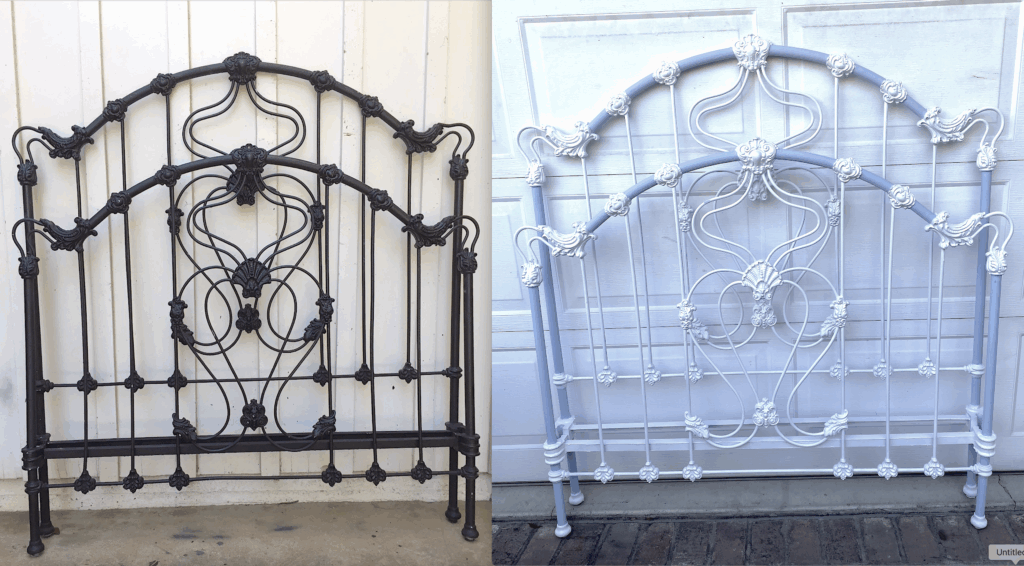
-
Floral or lace bedding
-
White or pastel-painted antique iron bed
-
Hanging plants, fairy lights, and ruffled curtains
️ Industrial Loft
-
Matte black or pewter finish
-
Concrete or brick accent walls
-
Minimalist bedding with neutral tones
️ Eclectic Boho
-
Bold colored iron bed (turquoise, mustard, etc.)
-
Mismatched vintage linens
-
Patterned rugs, woven throws, and layered textures
Avoid These Common Mistakes
-
Skipping Sandblasting
Without proper prep, paint won’t adhere and rust will return. Sandblasting gives you a clean, long-lasting foundation. -
Painting Over Rust
Even a small amount of untreated rust can spread under new paint. Always clean thoroughly or use rust converter. -
Using the Wrong Paint
Only use paint designed for metal (enamel or epoxy). Regular wall paint will chip and peel quickly. -
Rushing Dry Time
Give each coat time to cure. This ensures durability and a smooth finish.
Final Thoughts: Preserving the Legacy of Antique Iron Beds
Refinishing an antique iron bed is more than a makeover — it’s an investment in craftsmanship, history, and sustainable living. With careful preparation, sandblasting, priming, and painting, your iron bed can reclaim its rightful place as a cherished heirloom or standout décor piece.
Whether you’re reviving a delicate Victorian frame or a sturdy farmhouse-style iron bed, the result will be a timeless addition to your home — full of character, charm, and stories worth sharing.