Actually a variation of Black. Regular Black can be a very dull lifeless color for anything, especially an iron bed or large piece of furniture. Yet with a few simple “tweak’s”, an otherwise lifeless color can come to life and have a rich organic look to it. Here are the steps that go into our old black iron finish. They will work on any piece of iron or wood, which sometimes can be made to look more like iron. All paints you’ll be using should be water base, no oil base paints.
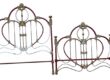
First: Be sure and have your bed clean of any rust or existing paint. This can only be achieved by sandblasting. Sandblasting will literally take off all the old paint and rust. It will not harm the iron at all. The great thing about sandblasting is that it gets all the layers of paint that have built up inside the detailed castings out. So the definition of the casting is much greater. Sandblasting also gives the cleanest and best possible surface to start a new finish. Do not chemically strip your bed. This will result in a surface that won’t hold the primer as well. Chemical stripping also results in future rust from the inside out.
Second: Equally as important as the first step is the primer. Be sure it’s a metal primer. Black primer is what you’re going to want to use. This should be applied evenly with 100% coverage on all the interior and exterior tubing. But only apply very sparingly on the castings, approximately 50% coverage with a lot of the sandblasted iron showing through.
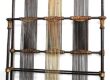
Third: A thinner coating of regular black paint should be applied. Do Not make this coating thick or layered. Much of it is going to be coming off. So the more you put on, the more you’re going to have to eventually take off.
Fourth: You’ll need to get a “box of rags” or an old torn up beach or bath towel. Get a 2 gallon container of Acetone from the hardware or paint store. Wet a rag with the acetone and start wiping of the black paint on the castings. Try and get off as much as possible. It’s not necessary to try and get it out of the cracks and crevices of the casting. But try and get off as much as possible from the face of each casting. After you’ve done all the castings on your bed, you’re now going to sporadically rub the black off sections of the interior and exterior tubing and rods, It’s not necessary to take all the paint off. Just get enough off so you have an irregular look to the surface of the tubing. These rubbed off areas are suppose to appear as wear marks on the tubing.
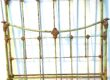
Fifth: You’ll need a tube of Raw Umber Acrylic. This should be applied over the entire bed with a smaller 1″ brush. This smaller brush will enable you to get into those cracks and crevices with the Raw Umber. This should be 100% coverage. But you’re only going to want to do small sections at a time. After applying the acrylic to about a foot square area, you’re now going to rub it off with a clean rag. Don’t be afraid to rub the acrylic in to the black to achieve a warm old iron look. Much of this stage are trial and error. It will soon become clear what you need to do. to achieve the look you want.
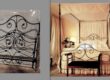
Sixth: Now……. take a look at your iron beds………….Once you’ve achieved the overall look you want, you’re now going to need to “seal” the finish. This is a simple process. Get two or three cans of Clear Krylon Spray. It comes in either Glossy , Semi-Gloss, or Mat. All three will give you a different “finished” look. This step is necessary to adhere all the colors and layers, especially the acrylics. Spray two to three coats evenly.
Hopefully you now have the authentic look you were going for.
I hope you’ve found this blog informative . I invite you to revisit my website
to answer any and all questions you might have about antique iron beds.
I also invite you to take a look at our company Face Book page for multiple photo albums on Custom Finishes, Canopy Conversions and a comprehensive “Before & After” King Conversions album.
Cathouse Antique Iron Be#B1BE56